
How To Upgrade Your Rental With Peel & Stick Wallpaper

I am not a DIY person by any stretch of the imagination. I like the dopamine hit of low-bar gratification. Give me a can of spray paint, and that’s about as DIY as I get. Because of this, peel and stick wallpaper (No need to get it right the first time! No endless measuring! No glue! No professional installation! No gnarly removal!) has been on my radar for a long time, but I’ve still been too intimidated to take the leap.
It took moving into a rental and realizing I don’t want to stare at Band-Aid colored walls every day to give me the courage to try out a company called Chasing Paper.
What is Chasing Paper?
Chasing Paper is a company founded in 2012 by a third-generation grand-format printing family that sources all of their materials from the Heartland, USA. They print made-to-order wallpaper, including traditional, faux grasscloth, matte vinyl (for those high-traffic areas), and peel and stick. The products are free from vinyl, VOC, PVC, and phthalates, and they use non-toxic water-based Greenguard Gold Certified ink.
“The products are free from vinyl, VOC, PVC, and phthalates, and they use non-toxic water-based Greenguard Gold Certified ink.”
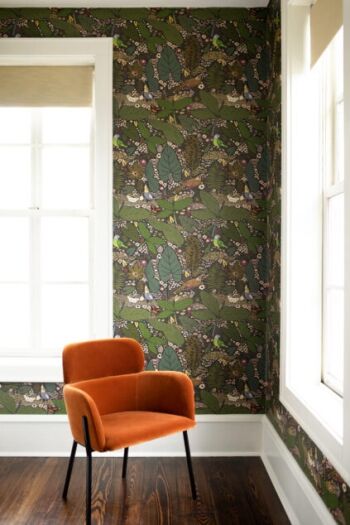
One of my hang ups (wink, wink) with wallpaper is the digital look of so many companies’ designs. Not so with Chasing Paper. It looks artisan, seemingly hand-drawn and handpainted, with unexpected color combos. I chose Birds of Paradise, which trades typical shades of green for nuanced accents of soft blush and light eggplant. The poly-woven fabric used for printing feels richly textured while still being water-resistant and washable.
“Their website even has a digital rendering tool so you can see your paper in a bedroom, bathroom, or living room.”
Chasing Paper divides their prints into easy-to navigate categories: Abstract, Animals, Botanicals, Geometric, Kids, and Novelty, offering a range of vibes but not so many choices that customers freeze in the face of excess. They also collaborate with Instagram influencers like Joni Lay and Bruna Tenorio, artists like David Quarrels IV, and interior design companies like Hyphen & Co to develop exclusive high-end designs at accessible price points.
Their website even has a digital rendering tool so you can see your paper in a bedroom, bathroom, or living room, making it easier to grasp the cumulative effect of a pattern, and way better than staring at a two-inch pixelated swatch trying to imagine it covering a room.
How to Install Chasing Paper Peel & Stick Wallpaper
Before I even placed my order, I sent Chasing Paper photos of my bedroom wall to make sure the texture wouldn’t interfere with the paper’s stickability (it won’t work on highly-textured walls or hand-troweled walls) and then used their Footage Calculator to make sure I could do math (yuck), and per the website’s recommendation, ordered about 15% more than needed…because, math (yuck).
My order came with a “Peel and Stick Install Checklist” with seven systematic steps, beginning with cleaning my wall, baseboards, and trim with a damp washcloth. I didn’t need to gather my tools since Chasing Paper sent me an adorable zippered pouch containing a pencil, an X-Acto knife, and a wallpaper smoothing tool. The brand recommends using a tape measure but I opted to install freehand so I could attest to how difficult (or easy) the job turned out to be.

I didn’t want to offend my landlord and lose my security deposit so I started with a 9.6 x8 inch swatch to test drive the material. Once it was clear that it worked, I climbed up on a dining room chair and started in the top left corner, peeling 6–8 inches at a time from the back of the panel, sticking the paper down bit by bit, and smoothing it out with my freshly washed hands (oil and dirt can prevent the paper from adhering). The brand uses panels in standard lengths of 2×4 feet (for the peel and stick only), 2×8 feet, and 2×12 feet, which is much simpler to maneuver than a whole roll.
Once I got to the baseboard, I realized I had a good three feet of leftovers. Rather than try to measure and cut, I jaggedly lopped off most of my excess, leaving about four inches to play with, like you would if you were wrapping a present and leaving the ends long so you could cut them into perfectly shaped corner folds. I then creased the remaining paper right along the baseboard, creating a natural cutting line, and ran my X-Acto knife along the hard edge of the smoothing tool as if it was a ruler. The result was a perfectly straight edge, without a tape measure.
Time for roll two.
Chasing Paper’s advice is true: I didn’t have to get it right the first time.
If there was a bubble, or my lines got wonky, I was able to peel back the panel and push out the bubble, or readjust the line up without losing any stickiness. Feeling brave, I didn’t even remove my outlet cover pre-installation; instead, I used my X-Acto knife to make tiny cuts along the bumpy edgy of the outlet cover and honestly, it worked out great. For the windows, I trimmed off lots of excess paper, and then used the straightedge side of the smoothing tool to press the paper right along the trim in two-inch increments before I cut, and stuck it down.
Halfway through my project, I called my friend Jess and confessed to her that using the smoothing tool was ridiculously satisfying, like dermaplaning a face— all I wanted to do for the rest of the day was line up the seam of one roll with the seam of the next and smooth out wallpaper bubbles. Like getting the gem in a gem painting exactly in the middle of the square, or putting the tiny stickers on a Lego set. “I’m obsessed with the minutiae of detail,” I told her.
“I call it washing the brain,” she replied, confirming that this kind of rote movement is a satisfying nervous system reset.
I’m considering allotting some of my therapy budget to wallpaper from here on out.
All in all, the project took up one afternoon while I listened to birds sing outside my windows and put Birds of Paradise on my wall. I had a slight bit of trouble perfectly lining up the seams and ended up deciding I didn’t mind seeing a teensy strip of white between panels. If this would drive you bats, I recommend choosing a lighter wallpaper so the seam lines don’t show up as much as on a dark background. Cutting around the window was the most difficult part of the whole thing; it would have helped if I’d caved and used a tape measure around the window trim.
Is Chasing Paper Worth the Investment?
With Chasing Paper’s wallpaper, I overhauled the look of my bedroom in basically three hours. I didn’t have to deal with toxic fumes, washing out paint brushes and trays, the noxious off-gassing of fresh paint, or a trip to the dump to dispose of paint cans. The project wasn’t complicated or time-consuming, or ever overwhelming.
It was minimal effort for maximum wow, a focal point that transformed my space. Now every time I look at my wall, I feel strong and creative— here’s proof I can do hard things, without a ruler or a tape measure or a stepladder, or even another person to help.

My biggest takeaway: Giving myself permission to try a new thing and trusting my capabilities turned my wall into a living memory— it’s not just decoration, it’s celebration…of ME.
And I can peel it off when it’s time to get back my security deposit.
P.S. I used my leftovers as drawer liners so now I have cockatoos and banana leaves beneath my spatulas!
Key Takeaways
- Chasing Paper prints made-to-order wallpaper, including traditional, faux grasscloth, matte vinyl (for those high-traffic areas), and peel and stick. The brand’s wallpapers add instant charm with their vibrant prints and pops of color.
- The company’s products are free from vinyl, VOC, PVC, and phthalates, and they use non-toxic water-based Greenguard Gold Certified ink. The experience was leagues away from the old days of dealing with paint and paint fumes.
- Installation was simple and straightforward. Chasing Paper’s panels come in standard lengths of 2×4’ (peel and stick only), 2×8’, and 2×12’ which are much simpler to maneuver than a roll. Installation of the peel and stick required just three tools included with purchase: a pencil, an X-Acto knife, and a wallpaper smoothing tool/straight edge. (Okay, I may have also added in scissors to make it go faster!)
- If you want a smooth line that doesn’t show seams and lines up perfectly with the ceiling, then you may want to hire someone to help. Or find a space to practice installing before you commit to a whole wall of your own.
- The paper is sticky, stays up for years, and can be peeled off easily in one long strip without any wall damage. Renters rejoice: You can love the space while you live in it, and leave the space the way you found it.
Trinity Wilbourn is a Denver-based freelance writer, mind/body coach and intuitive guide. As an educational consultant, she works at the intersection of Social Emotional Learning, Mindfulness, and the science of nervous system regulation. In her free time, she can be found hanging with her four kids, spooning her Bernedoodle, singing opera, and dancing in the kitchen. Learn more and explore her offerings at www.trinitywilbourn.com or follow her on Instagram.


